
Simple Form Login Page with Apache Sling
Jun 25, 2016 · 6 minute read · CommentsSlingJavaOSGI
In this posts we will show a simple example on how to create a login page with Apache Sling and also define which paths will ask for the user to login in the site using our login page.
In order to execute the example we need to have the Sling Lauchpad running in our machine. For this we can download the binary from the Apache Sling website in Downloads Section.
If you have Docker installed in your machine you can use the Sling docker image.
Once you have you Sling Launchpad running we can now create our project.
Apache Sling provide some Maven Archetypes to create Sling Based projects. We are going to use sling-intitial-content-archetype. The complete list of the available archetypes can be found here.
By using eclipse we need to go:
File -> New.. -> Project -> Maven -> Maven Project
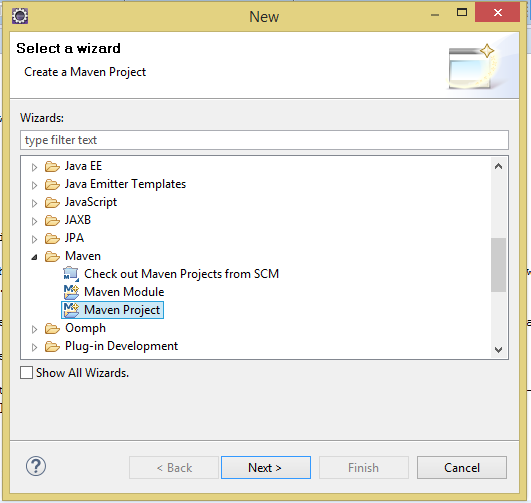
Then in the archetype selection choose the sling-intitial-content-archetype.
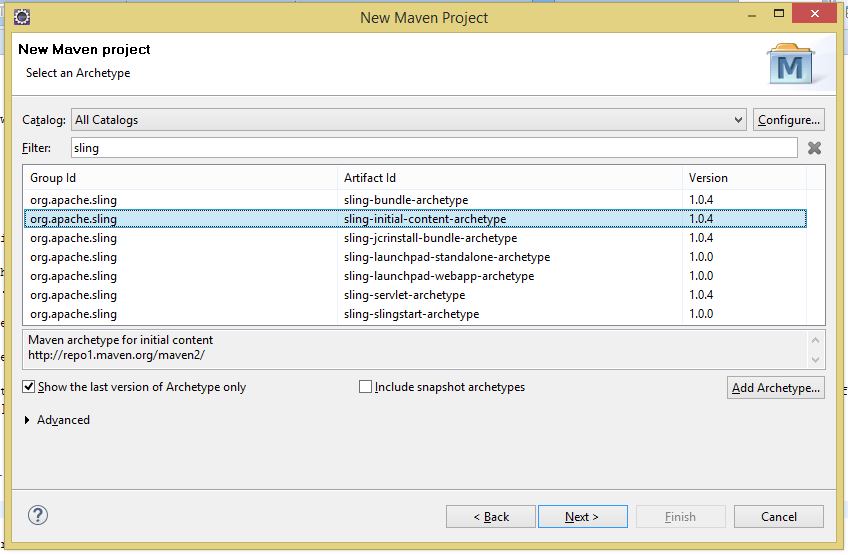
Then enter the groupid and artifactid for your project.
Create Login Page
For the login page I’ve used a Bootstratp Form.
First we are going to create the rendering script for the login page. For this we will create the following folder structure on src/main/resources/SLING-INF
sling-form-login/login
Inside this folder we create the login.html. This will be the script that will be called when the login page is requested. We can see it below:
  <div class="container">
        <div class="row">
            <div class="col-sm-6 col-md-4 col-md-offset-4">
                <h1 class="text-center login-title">Sign in to continue to Bootsnipp</h1>
                <div class="account-wall">
                    <img class="profile-img" src="https://lh5.googleusercontent.com/-b0-k99FZlyE/AAAAAAAAAAI/AAAAAAAAAAA/eu7opA4byxI/photo.jpg?sz=120"
                        alt="">
                    <form method="POST" action="/j_security_check" autocomplete="off" class="form-signin">
                    <input type="text" class="form-control" placeholder="Username" required autofocus name="j_username">
                    <input type="password" class="form-control" placeholder="Password" required name="j_password">
                    <input type="hidden" name="sling.auth.redirect" value="/content/page/home.html">
                    <button class="btn btn-lg btn-primary btn-block" type="submit">
                        Sign in</button>
                    <label class="checkbox pull-left">
                        <input type="checkbox" value="remember-me">
                        Remember me
                    </label>
                    <a href="#" class="pull-right need-help">Need help? </a><span class="clearfix"></span>
                    </form>
                </div>
                <a href="#" class="text-center new-account">Create an account </a>
            </div>
        </div>
    </div>
The most important parts of this snippet are:
- The form action set to: /j_security_check
- The username input set to: j_username
- The password input set to j_password
Now we need to create a node in the repository that will use this rendering script. For this we need to create a new file under SLING-INF/content:
login.json
with the content below:
{
    "jcr:primaryType" : "nt:unstructured",
    "sling:resourceType" : "sling-form-login/login"
}
With that JSON file we are defining a new node in the repository which have nt:unstructured as primary type and sling-form-login/login as resource type. With this configuration we’ve defined that this node we will use the rendering script we defined in the last step.
In order to test if our configurations are ok, we need to deploy our project into Sling Launchpad. Before we deploy it, we need to make some adjustments in our pom.xml. In the maven-bundle-plugin we will have the following config:
<Sling-Initial-Content>
    SLING-INF/apps/sling-form-login;overwrite:=true;uninstall:=true;path:=/apps/sling-form-login,
    SLING-INF/content;overwrite:=true;uninstall:=true;path:=/content
</Sling-Initial-Content>
Once we change it, we can deploy our project by running the following maven command:
mvn clean install -P autoInstallBundle
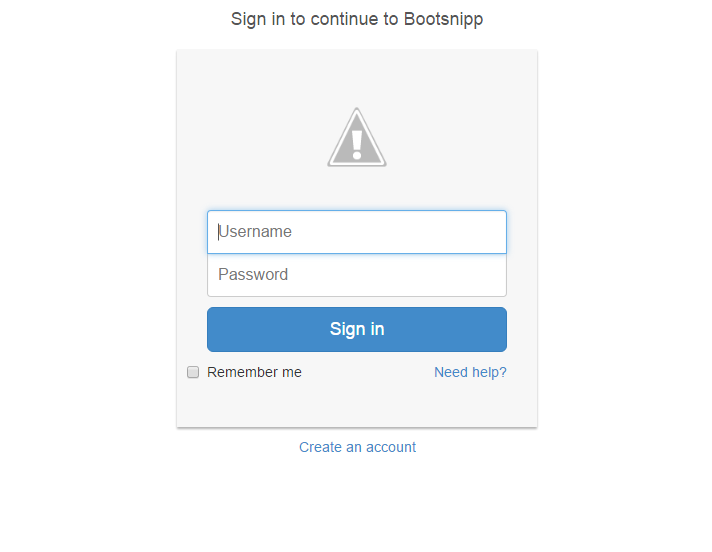
If everything goes well then we can access the following url:
http://localhost:8080/login.html
And we can see our login page:
Create a Content Page
Now we are going to create the page we want to protect using our login screen. This will be a simple page that will display the current user login name.
Basically we are going to use the same steps we followed for the login page.
Create the Rendering Script at /SLING-INF/sling-form-login/page
//page.jsp
<%@ page session="false" %>
<%@ page import="javax.jcr.*,
        org.apache.sling.api.resource.Resource"
%>
<%@ taglib prefix="sling" uri="http://sling.apache.org/taglibs/sling/1.0" %>
<sling:defineObjects />
<%
    String userID = resourceResolver.adaptTo(javax.jcr.Session.class).getUserID();
%>
<html>
    <body>

        <h1>
            Hello, <%=userID%>
        </h1>
    </body>
</html>
Basically this JSP gets the current user and display its userId.
Then create the node that will use the rendering script at /SLING-INF/content/page/home.json
{
    "jcr:primaryType" : "nt:unstructured",
    "sling:resourceSuperType" : "sling-form-login/page"
}
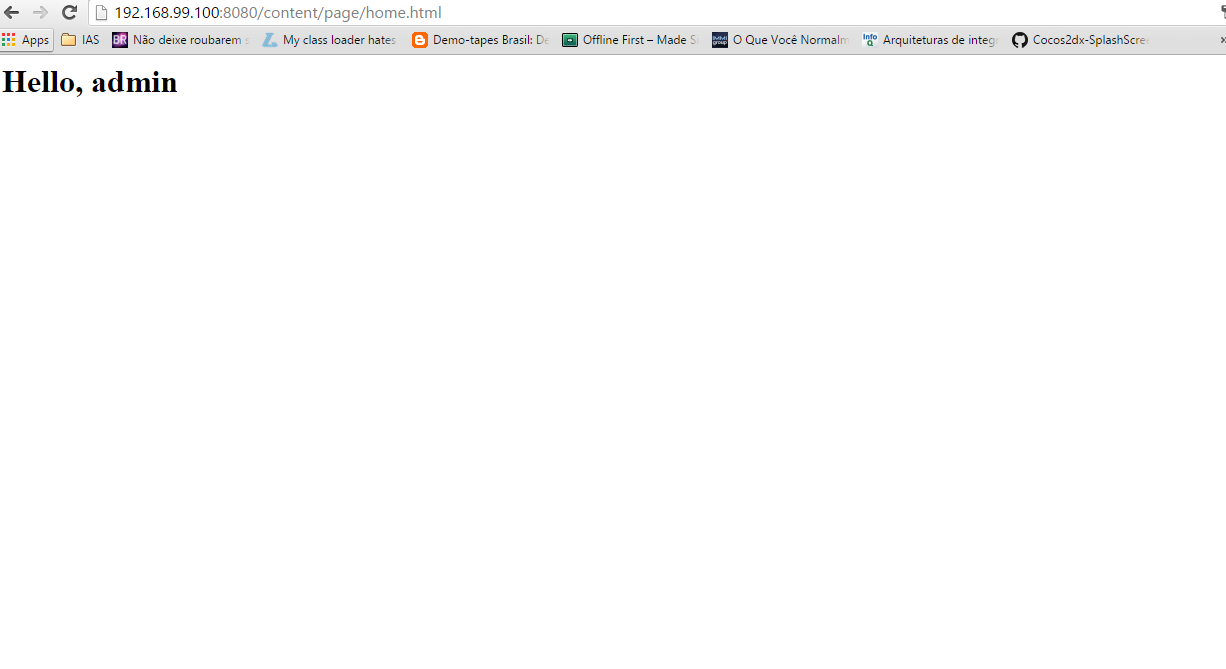
Then we deploy our project again. If everything is fine than can access the following URL:
http://localhost:8080/content/page/home.html
And see this:
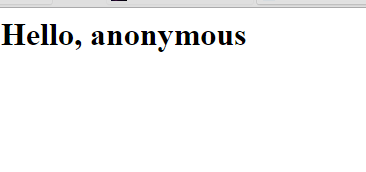
If you were logged then you can see your user id.
Set the home.html as a protected page
To define that our content page(home.html) requires authentication, we need to configure the Sling Authentication Service.
We can do this by the Felix Console
http://localhost:8080/system/console/configMgr
Then find the Sling Authentication Service, if you click you can see the details like below:
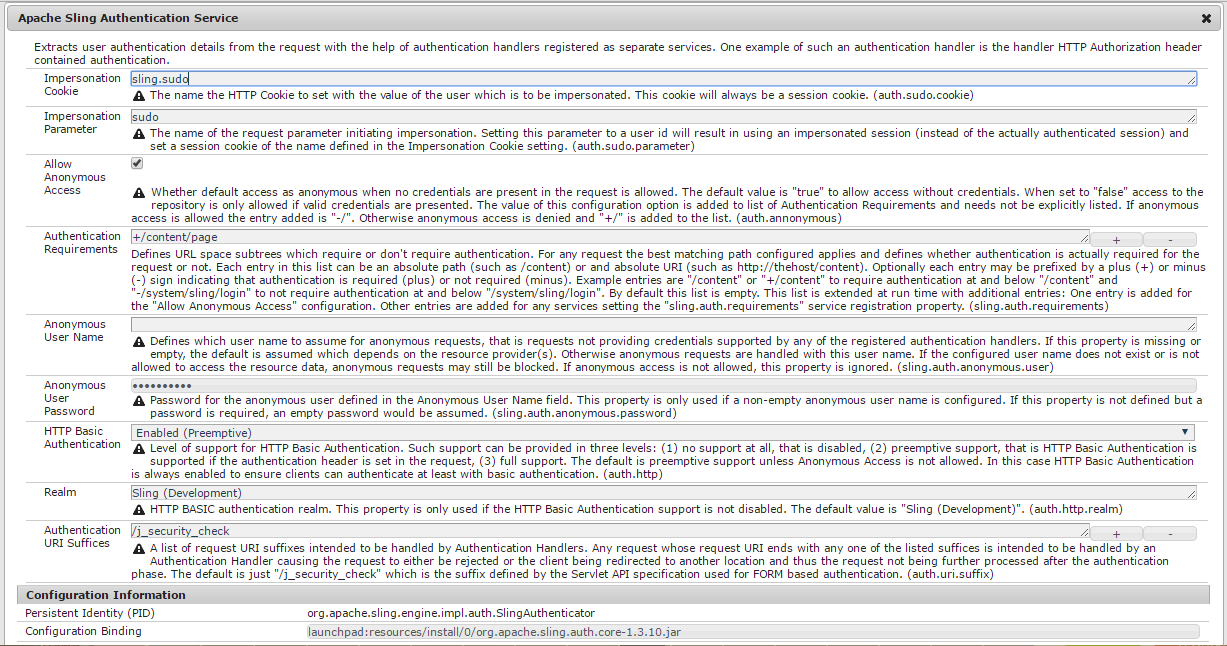
We need to set the Authentication Requirements(sling.auth.requirements) by entering the paths that will required authentication.
Another possible way is creating a sling:OsgiConfig node in the repository. This is the way we will use.
For this we will create a node which name is the PID. We can find the PID in the bottom of the above screenshot where we see Persistent Identity (PID), so we are going to create a new node under:
/SLING-INF/sling-form-login/install
And name it as:
org.apache.sling.engine.impl.auth.SlingAuthenticator.json
And its contents will be like below:
{
    "jcr:primaryType": "sling:OsgiConfig",
    "sling.auth.requirements": [
      "+/content/page"
    ]
}
With this configuration, we are saying that all paths starting with /content/page require authentication to access them. We set this by adding the plus(+) sign before the path. If we used the minus(-) we were saying that the path doesn’t require authentication.
Now if we deploy our last change, when we try to access the content page we created we will be redirected to a login screen, in this case the default login page of the system.
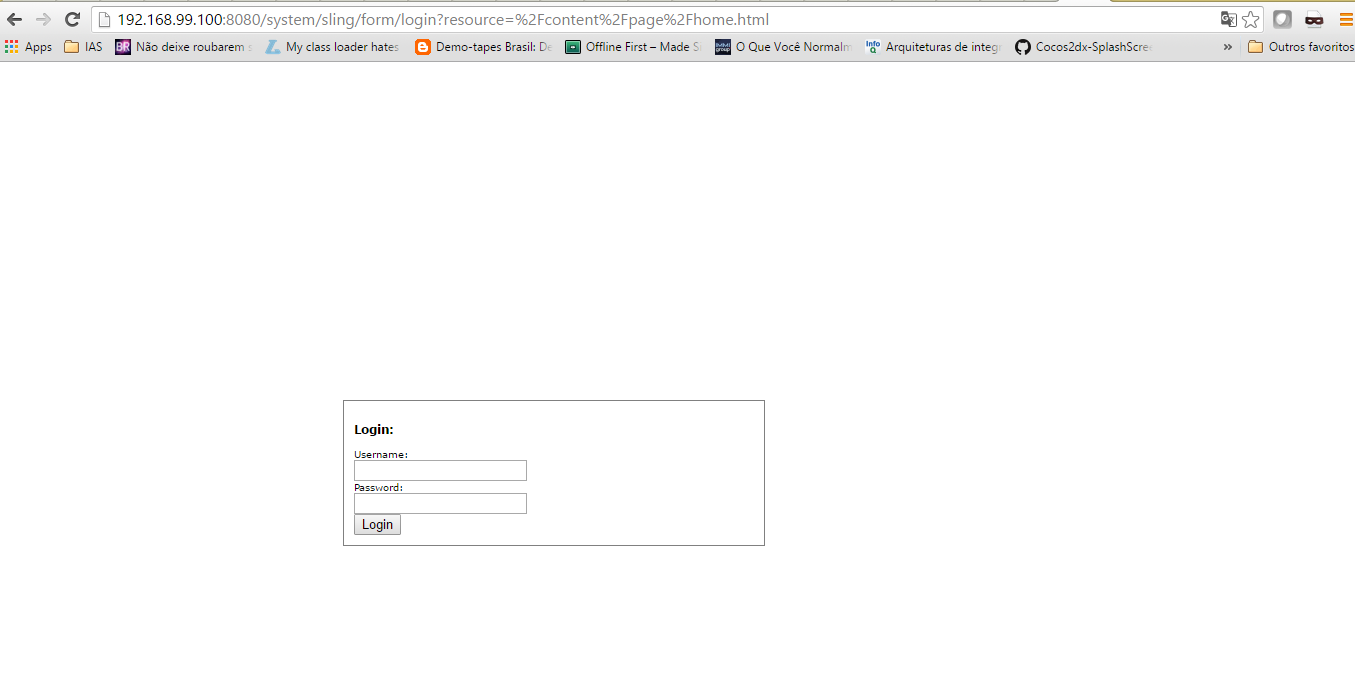
If we log with admin/admin or any other user you have. It will redirect to our page and display the username:
Great!! Now let’s take the next step.
Define the login Screen
The default login screen used by Sling is defined in the Apache Sling Form Based Authentication Handler. It has a property where we can set the login form as we can see below:
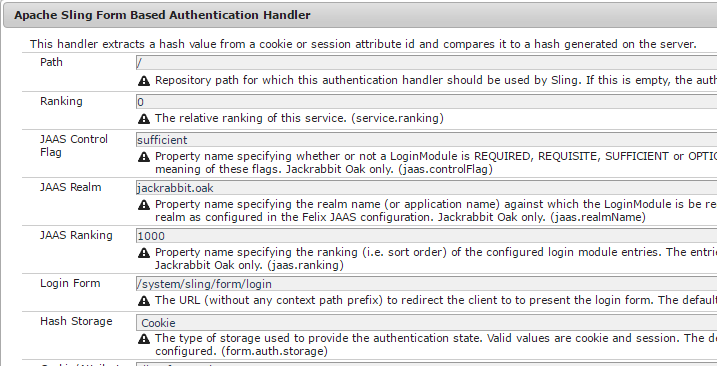
The property we need to change is Login Form(form.login.form).
To do this we will do something similar as we did for the Authentication Service, we will create a sling:OsgiConfig node using the PID as node name in this case
org.apache.sling.auth.form.FormAuthenticationHandler.json
Its contents can be seen below:
{
    "jcr:primaryType": "sling:OsgiConfig",
    "form.login.form": "/content/login.html"
}
After deploying our last change, if we try to access the home.html page not logged in we are redirected to our custom login page as we can see below:
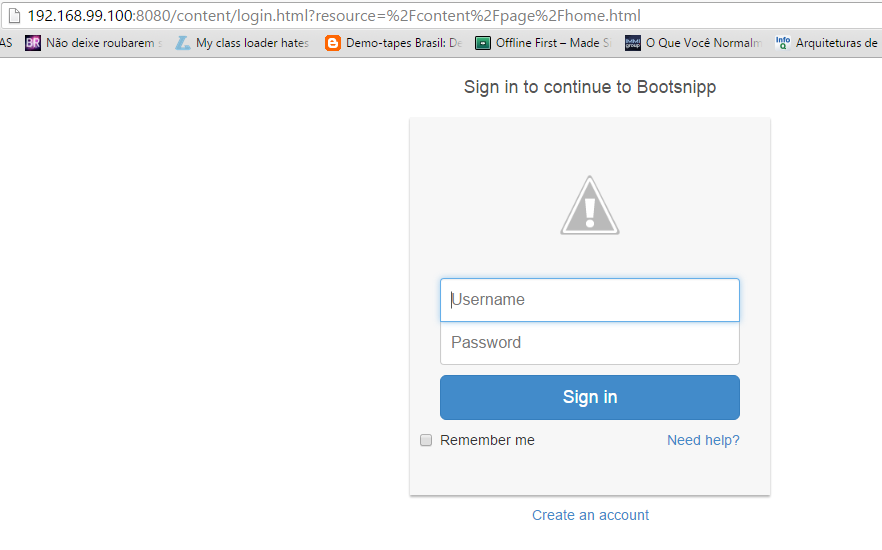
If we login then we will see the home.html with our userId.
If you are using docker
In order to execute the sling image, first we need to download the image:
docker pull apachesling/sling
Then to create a container using the image:
docker run -d -p 8080:8080 apachesling/sling
Then it will start a container and expose the port 8080. If you are using docker-machine(that’s my case) you can not access localhost once the container is running the docker-machine VM.
You need to find the docker-machine IP. You cand do this using the following command:
docker-machine ip default
Also if you are on docker-machine remember to change you pom.xml to point to your docker-machine IP in order to be able to deploy the project.
That’s it! I hope you enjoyed this post. You can find all the source code in my Github.
Thanks, See you in the next post.